WireGuard
WireGuard® is an extremely simple yet fast and modern VPN that utilizes state-of-the-art cryptography. It aims to be faster, simpler, leaner, and more useful than IPsec, while avoiding the massive headache. It intends to be considerably more performant than OpenVPN. WireGuard is designed as a general purpose VPN for running on embedded interfaces and super computers alike, fit for many different circumstances. Initially released for the Linux kernel, it is now cross-platform (Windows, macOS, BSD, iOS, Android) and widely deployable. It is currently under heavy development, but already it might be regarded as the most secure, easiest to use, and simplest VPN solution in the industry.
Prerequisites
If you want to use your services at home, wherever you are, the following steps are required.
Dynamic DNS
If you do not have a static IP from your Internet Service Provider (ISP), a Dynamic DNS (DDNS) is required. So you need to create an account with one of the providers listed below:
DDClient
Install ddclient and search for your chosen provider and enter your credentials there.
pacman -S ddclient
nano /etc/ddclient/ddclient.conf
systemctl enable --now ddclient.service
Port forwarding
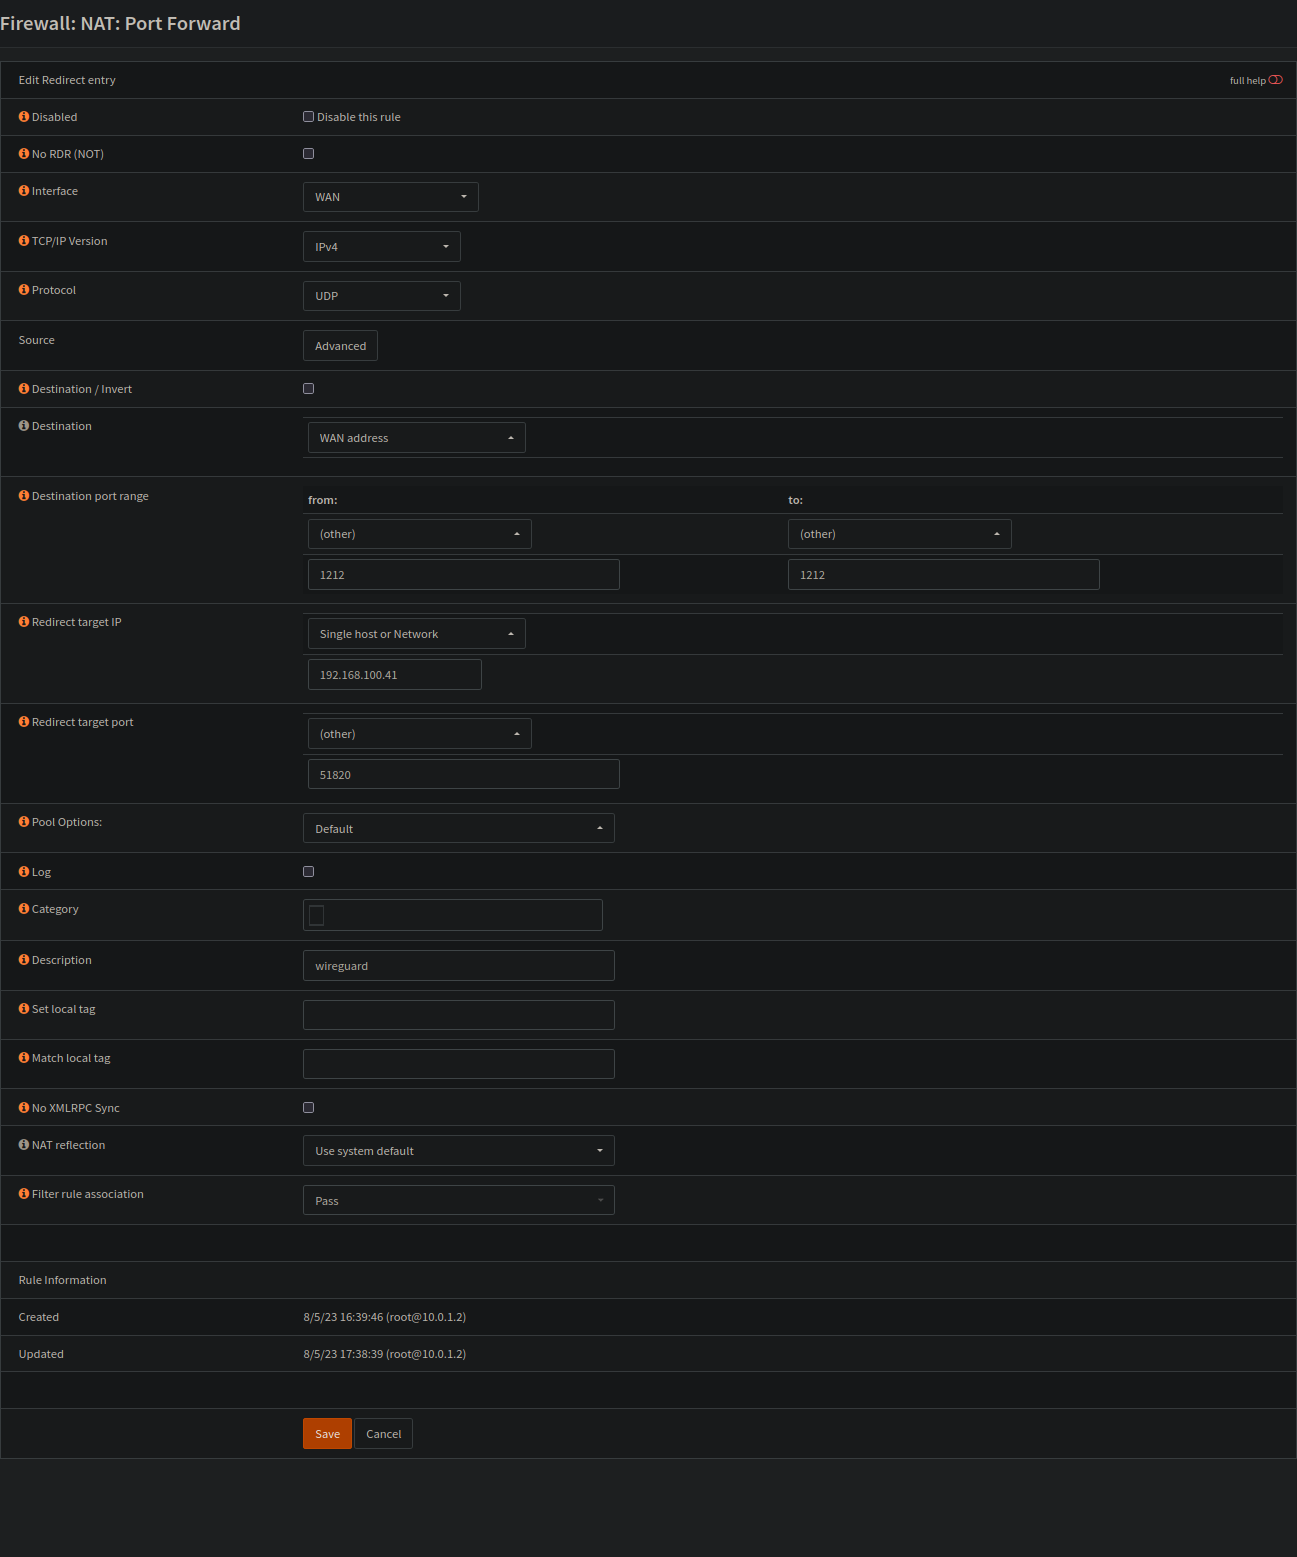
We will use Wireguard to access your server over the Internet. To do this, you must open a port in your router and forward it to your server.
The wireguard port listens on 51820 by default. If you want to change this, you need to redirect the port to your chosen number and adjust the tutorial accordingly.
The example below is based on OPNsense, but it is basically the same for other devices as well.
The example below also has a different destination port (1212). If you want to change this as well, you have to change Endpoint = <server public IP or domain>:1212 under clients as well:
Server
Do everything with root.
su
Packages
pacman -S wireguard-tools
Keys
cd /etc/wireguard/
umask 077; wg genkey | tee privatekey | wg pubkey > publickey
wg0.conf
Interface
Copy and paste the private key under PrivateKey = .
cat privatekey
nano wg0.conf
[Interface]
PrivateKey = <Private Key>
Address = 10.0.0.1/24
ListenPort = 51820
Peer
- Go to clients first and follow the instructions.
- Copy the publickey and presharedkey of your client.
cat /etc/wireguard/clients/phones/pinephone/publickey
cat /etc/wireguard/clients/phones/pinephone/presharedkey
- Add the peer
nano /etc/wireguard/wg0.conf
[Peer]
# pinephone
PublicKey = <client public key>
PresharedKey = <preshared key>
AllowedIPs = 10.0.0.2/32
Clients
Create clients for laptop, desktop, phone and so on. Wherever you need it for.
mkdir -p /etc/wireguard/clients/phones/pinephone/
It is better to store them somewhere else. On a USB stick or so. Or just delete it after the configuration.
Keys
cd /etc/wireguard/clients/phones/pinephone/
umask 077; wg genkey | tee privatekey | wg pubkey > publickey | wg genpsk > presharedkey
cat privatekey && cat /etc/wireguard/publickey && cat presharedkey
nano pinephone.conf
[Interface]
PrivateKey = <pinephones-privatekey>
Address = 10.0.0.2/24

[Peer]
PublicKey = <server public key>
PresharedKey = <preshared key>
Endpoint = <server public IP or domain>:51820
AllowedIPs = 0.0.0.0/0
Add another DNS server under
[Interface] in the configuration of your client, e.g. if you do not want to use the DNS server of your provider.
DNS = `dns server`Permissions
Set the right permissions.
chmod -R 600 /etc/wireguard/clients/
Copy file
Copy your .conf file to your device.
scp pinephone.conf USER@IP:~/
Generate QR Code
You can also create an QR code.
pacman -S qrencode
qrencode -t ansiutf8 < pinephone.conf
Back to peer
More clients
If you need more clients, just follow the clients process again and add the peer to your server among your other clients.
systemctl stop wg-quick@wg0.service
Start
systemctl enable --now wg-quick@wg0.service
Firewall
Based on firewalld.
- create a new zone (name it:
wireguard) - add “
wg0interface” to your new wireguard zone - add/open wireguards service (port 51820) to your home zone
- add/open https service (port 443) to your wireguard zone (to reach your services, which should be based on ssl)
- add masquerade to your home zone
- and create a new policy for internet and services access
Checks
You can check your clients connections via the command wg on your wireguard server. You should see:
  latest handshake: 1 minute, 52 seconds ago
  transfer: 1.22 MiB received, 3.80 MiB sent
Also check the IP address of your clients, for example with https://dnsleaktest.com, which should be the IP address of your home, and click the Extended test button for the DNS server you are using which can be different on your Android device if DNS isn't set on clients side.